2022 Chevrolet Blazer
midsize SUV / 4-door SUV
Small overlap front: driver-side
Rating applies to 2019-25 models
Tested vehicle: 2020 Chevrolet Blazer 4-door 4wd
The Chevrolet Blazer was reintroduced in the 2019 model year.
| Evaluation criteria | Rating |
|---|---|
| Structure and safety cage | |
| Driver injury measures | |
| Head/neck | |
| Chest | |
| Hip/thigh | |
| Lower leg/foot | |
| Driver restraints and dummy kinematics | |

Action shot taken during the driver-side small overlap frontal crash test.
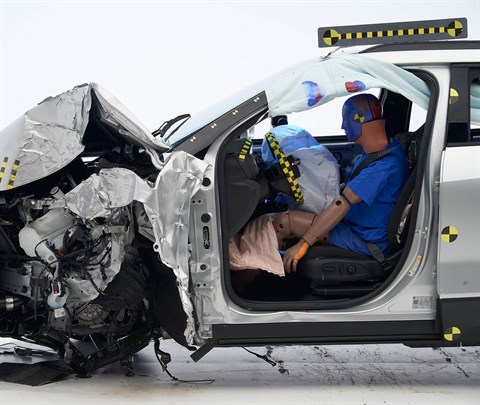
The dummy's position in relation to the door frame, steering wheel, and instrument panel after the crash test indicates that the driver's survival space was maintained very well.
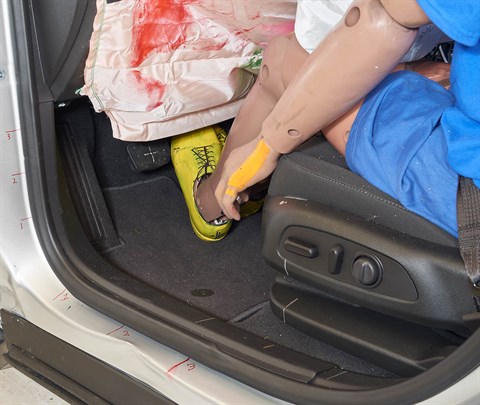
The driver's space was maintained well, and risk of injuries to the dummy's legs and feet was very low.
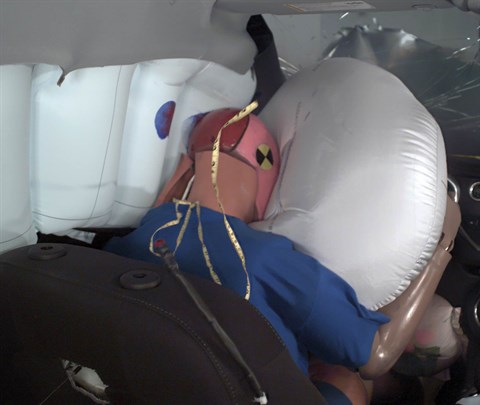
The frontal and side curtain airbags worked well together to keep the head from coming close to any stiff structure or outside objects that could cause injury.
Technical measurements for this test
Small overlap front: passenger-side
Rating applies to 2019-25 models
Tested vehicle: 2020 Chevrolet Blazer Premiere 4-door 4wd
The Chevrolet Blazer was reintroduced in the 2019 model year. Passenger-side small overlap frontal ratings are assigned by the Institute based on a test of a 2020 Chevrolet Blazer conducted by General Motors.
| Evaluation criteria | Rating |
|---|---|
| Overall evaluation | |
| Structure and safety cage | |
| Passenger injury measures | |
| Head/neck | |
| Chest | |
| Hip/thigh | |
| Lower leg/foot | |
| Passenger restraints and dummy kinematics | |
| Driver injury measures | |
| Head/neck | |
| Chest | |
| Hip/thigh | |
| Lower leg/foot | |
| Driver restraints and dummy kinematics | |
Technical measurements for this test
Moderate overlap front: original test
Rating applies to 2019-25 models
Tested vehicle: 2019 Chevrolet Blazer Premier 4-door 4wd
The Chevrolet Blazer was reintroduced in the 2019 model year. Moderate overlap frontal ratings are assigned by the Institute based on a test of a 2019 Chevrolet Blazer conducted by General Motors.
| Evaluation criteria | Rating |
|---|---|
| Overall evaluation | |
| Structure and safety cage | |
| Driver injury measures | |
| Head/neck | |
| Chest | |
| Leg/foot, left | |
| Leg/foot, right | |
| Driver restraints and dummy kinematics | |
Technical measurements for this test
Side: original test
Rating applies to 2019-25 models
Tested vehicle: 2019 Chevrolet Blazer Premier 4-door 4wd
The Chevrolet Blazer was reintroduced in the 2019 model year. Side ratings are assigned by the Institute based on a test of a 2019 Chevrolet Blazer conducted by General Motors.
| Evaluation criteria | Rating |
|---|---|
| Overall evaluation | |
| Structure and safety cage | |
| Driver injury measures | |
| Head/neck | |
| Torso | |
| Pelvis/leg | |
| Driver head protection | |
| Rear passenger injury measures | |
| Head/neck | |
| Torso | |
| Pelvis/leg | |
| Rear passenger head protection | |
Technical measurements for this test
Roof strength
Rating applies to 2019-23 models
Tested vehicle: 2020 Chevrolet Blazer RS 4-door 4wd
| Overall evaluation | |
|---|---|
| Curb weight | 4,300 lbs |
| Peak force | 20,696 lbs |
| Strength-to-weight ratio | 4.81 |
Head restraints & seats
Seat type: Power leatherette seat
| Overall evaluation | |
|---|---|
| Dynamic rating | |
| Seat/head restraint geometry |
Technical measurements for this test
About the head restraint & seat test
Currently, IIHS tests apply only to front seats.
Headlights
Ratings are given for 2 different headlight variations available on this vehicle.
Trim level(s)
- RS trim equipped with Driver Confidence II package
- Premier trim equipped with Driver Confidence II package
| Evaluation criteria | Rating |
|---|---|
| Low-beam headlight type | LED projector |
| High-beam headlight type | LED projector |
| Curve-adaptive? | No |
| High-beam assist? | Yes |
|
Overall rating | |
| Distance at which headlights provide at least 5 lux illumination: | |
Low beams
On the straightaway, visibility was good on both sides of the road. On curves, visibility was fair in all 4 tests.
The low beams created some glare.
High beams
On the straightaway, visibility was good on the right side of the road and fair on the left side. On curves, visibility was good on the gradual left curve, fair on the gradual right and sharp left curves, and inadequate on the sharp right curve.
High-beam assist compensates for some limitations of this vehicle's low beams on both left curves and on both right curves.
Technical measurements for this test
Trim level(s)
- 3LT trim
- 2LT trim
- RS trim
- Premier trim
| Evaluation criteria | Rating |
|---|---|
| Low-beam headlight type | HID projector |
| High-beam headlight type | HID projector |
| Curve-adaptive? | No |
| High-beam assist? | Yes |
|
Overall rating | |
| Distance at which headlights provide at least 5 lux illumination: | |
Low beams
On the straightaway, visibility was good on both sides of the road. On curves, visibility was fair in all 4 tests.
The low beams created excessive glare.
High beams
On the straightaway, visibility was inadequate on both sides of the road. On curves, visibility was inadequate in all 4 tests.
High-beam assist compensates for some limitations of this vehicle's low beams on the straightaway and on both left curves.
Technical measurements for this test
Front crash prevention: vehicle-to-vehicle
Ratings are given for 2 different trim variations available on this vehicle.
Front crash prevention: pedestrian (day)
Ratings are given for 2 different systems available on this vehicle.
Child seat anchors
Rating applies to 2019-25 models
| Evaluation criteria | Rating |
|---|---|
| Overall evaluation | |
| Vehicle trim | RS |
| Seat type | leather |
This vehicle has 2 rear seating positions with complete child seat attachment (LATCH) hardware.
It has 1 additional seating position with a tether anchor only.
| Evaluation criteria | Rating |
|---|---|
| Overall evaluation | |
| Vehicle trim | RS |
| Seat type | leather |
| Rating icon | Rating |
|---|---|
| G | Good |
| A | Acceptable |
| M | Marginal |
| P | Poor |
| Seating positions that rely on borrowed lower anchors or have only a tether anchor available are not rated. | |
thether anchor symbol | Tether anchor |
lower anchor symbol | Lower anchors |
| Lower anchor(s) can be borrowed from adjacent positions(s) | |
| No hardware available |
Details by seating position
| Position | Rating |
|---|---|
| 1 | |
| Tether anchor | |
| easy-to-find location | |
| other hardware could be confused for anchor | |
| Lower anchors | |
| not too deep in seat | |
| not too much force needed to attach | |
| easy to maneuver around anchors | |
| 2 | |
| Tether anchor | |
| easy-to-find location | |
| other hardware could be confused for anchor | |
| Lower anchors | |
| none available | |
| 3 | |
| Tether anchor | |
| easy-to-find location | |
| other hardware could be confused for anchor | |
| Lower anchors | |
| not too deep in seat | |
| not too much force needed to attach | |
| easy to maneuver around anchors |
Technical measurements for this test